Showing posts with label Casey (Little Lifelong Learners). Show all posts
Meet the collaborators from the Australian Teachers Blog - Casey from Little Lifelong Learners


With the influx of new readers over here on our blog, we have decided to re-introduce ourselves. Today it's Casey's turn!


Why hello there! My name is Casey and I am the teacher-mama blogger over at Little Lifelong Learners. I have been blogging since I first started teaching back in 2012!

My little corner of the internet has evolved a lot, particularly over the last few years as I became a Mum for the very first time. When I first started blogging, my husband and I had just gotten married and I was a fresh graduate who felt very inspired by the amazing teachers who blogged about their classrooms and shared their amazing teaching ideas. 


After two years of teaching Prep / Foundation, I fell pregnant and took some time away from the classroom. I did some relief work at local schools and got to teach at many different schools in a variety of year levels...but Prep has always been where my heart is at!
 
Prep, Foundation Classroom | My first classroom as a grauate, beginning teacher in Australia

As my daughter got older, I started missing teaching more and more but I couldn't bare the thought of leaving her just yet. That's when I decided to focus on providing quality printables for other Prep teachers. I was basically living vicariously through them because I missed the classroom soooo much.
 
Must have resources for new teachers | Australian Prep and Foundation printable resources | Behaviour Management


During this time, I started blogging about my love for sensory play. Some of my favourite posts can be found over at Little Lifelong Learners. I've also recently launched my first eBook too which you can have a little look at here.

Sensory Play for babies | Messy play ideas for kids | Teacher mum

Now it's 2017 and I have a very energetic 2.5 year old daughter and a cheeky 6 month old son. I still miss teaching SO much (especially when I see you all decorating your new classrooms!) but I'm also so so so happy that I can provide Prep and Foundation teachers and parents with heaps of teaching and learning inspiration from the comfort of my own home. 


If you'd like to follow my journey as a teacher turned stay at home mama, you can find me here:

Ahhh the silly season is fast approaching, so today I'd like to share 5 simple Christmas ornament crafts for you to do with your children!

http://www.littlelifelonglearners.com/

1. Paddle Pop Christmas Tree


This is probably one of the most popular Christmas tree decorations because it's so easy to make! All you need are three paddle pop sticks, some green paint, decorations (sequins, buttons, pom poms, glitter etc) and some cardboard for the base. So easy but super adorable!


2. Reindeer Handprint


This is my favourite Christmas ornament for younger students because parents can look back for years to come and see how tiny their children's little hands were. You just need to paint their hands with brown paint and print them onto light brown card. Cut the hands out, laminate then hot glue some googly eyes and sparkly red noses. So cute!


3. Peg Reindeer


How cute are these little guys? All you need are three wooden pegs, a paddle pop stick, some googly eyes, a pom pom and some brown paint. I actually used a hot glue gun as well to attach all of the pieces so that the Reindeer would stay together. I also cut a few centimetres off the end of the paddle pop stick to make the body a bit shorter. They would look so cute all lined up together or hung from the tree!


4. Beaded Candy Cane


Not only is this a fun little activity for younger students, it's also a great patterning activity! You can get bags of coloured 'pony beads' from your local dollar store. I threaded my beads onto a red pipe cleaner. You might even like to provide students with lots of different coloured beads for some variety!


5. Reindeer Photo Ornament


How sweet is this little decoration?! You could either attach a piece of ribbon so that it can be hung in a tree or add a magnet to the back for display on the fridge. For this craft, you'll need brown paint, 4 paddle pop sticks, some brown card, pipe cleaners, pom poms and  googly eyes. I used hot glue to attach all of the pieces for longevity but you could also use plain craft glue.


 So there you have it! Five incredibly easy but very fun Christmas ornaments for you to make as part of your end of year celebrations this year!

Hello everyone! This is Casey from Little Lifelong Learners. This week I am going to share some of my favourite ways to learn sight words in the early years classroom!


As we all know, learning to read is one of the biggest skills we develop during our time at school. It's a skill that we all use every single day so it's important we give our students a wonderful and positive foundation for early reading during their first years at school. 

Learning sight words is one of the first steps in learning how to read and there are so many fun ways we can encourage our students to learn these words. Today I'm going to share some of my very favourite activities that I've come across!

Crayon resist sight words - Write the words with a white crayon and paint over them with water colours.


Type your words - grab some old keyboards and have students type their words.


Shaving Cream - I love this idea by Jem's Bright Buttons. She squirts shaving cream onto plates where her students can write their words over and over. It's so easy to clean up afterwards because you just wash the plate!


Scrabble Tiles - You can get these relatively cheaply from ebay and the kids just love arranging the letters into their words.


Whiteboard Words - Grab a set of whiteboards (you can get them very cheap at places like Daiso or the $2 shops) and have your students write their words with markers. Such a simple and effective idea from Paula's Place.


Tic Tac Toe - I came across this fantastic idea by Jacinta (@cintaandco) on Instagram and I thought it looked like so much fun! Write your sight words onto different coloured paper and use them as counters for the game.


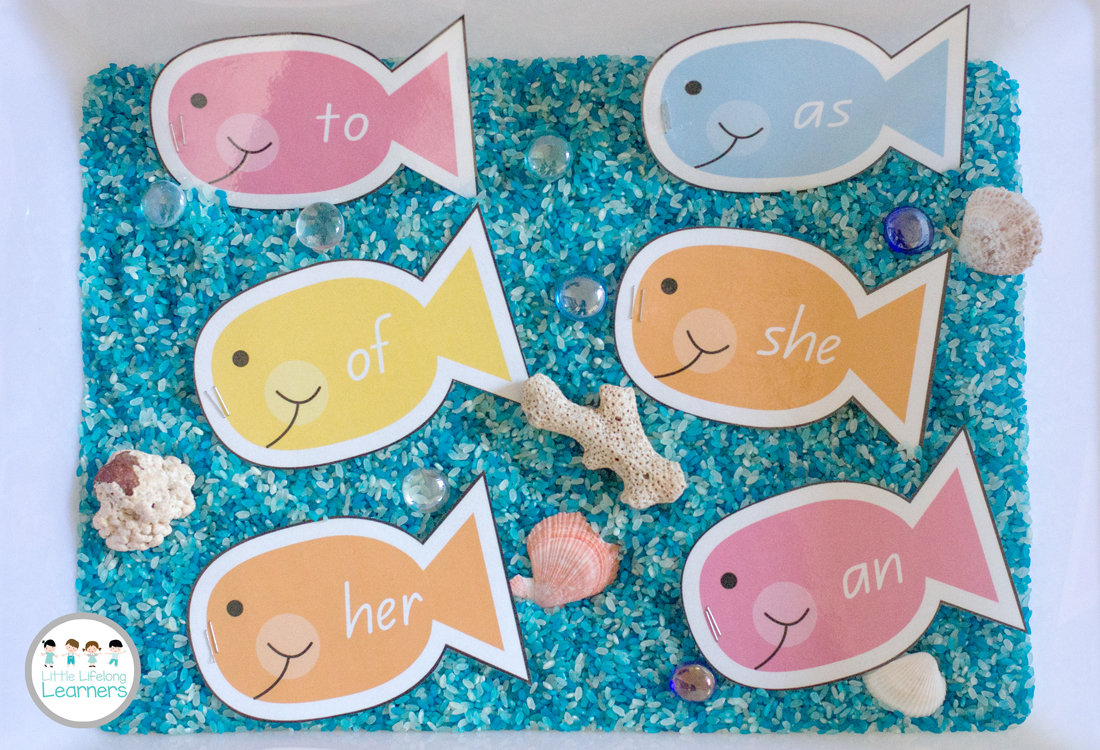
Sight Word Fishing - Write the sight words onto fish and add staples or paperclips to the end. Use a magnetic rod so that students can 'catch' their words.

Salt Writing - Paula's Place shared this wonderful idea for sight word work - tracing words into a tray of salt. This would be a wonderful sensory experience for students as well!


Text it - Grab this free download from TPT, print and then laminate. This one was always super popular with my Prep students!


Bottle Cap Stacking - This fantastic idea from A Little Pinch of Perfect is a great way to review sight words! I love that she is recycling materials too - something I'm sure we all do as early years teachers!


Bead Words - Fine Motor and Sight Word development at it's finest! This is such a great idea from @kindergarten_adventures_ - she writes the words onto her blackboard table and has the students place beads over her writing. They are working on their words and important fine motor skills at the same time. Love it


For more fun sight word activities, check out some of my sight word posts on the Little Lifelong Learners blog!
Hi everyone! It's Casey here from Little Lifelong Learners.

http://littlelifelonglearners.com/

Many teachers are now back at school for Term 2 which means many of us are now being stretched to our limits trying to fit everything into our very busy schedules.

Source: https://au.pinterest.com/pin/131589620338931225/
Sometimes it feels like we have more things to tick off our to-do list than we actually have time to complete! So today I want to share with you a little time saving tip that I use in my own classroom to help me stay organised and on top of things in my classroom. At the end of the post, you'll also find a link up where you can read more great tips to help save time in your classroom (and you can add your own!)


In my classroom, I have 5 baskets set up in my main teaching space - one for each day of the week. Inside, you will find all of the resources I will need for the week. This might include specific books that I will be reading with my class, numeracy resources, photocopies, WALT and WILF lesson posters and so on.


On Monday morning, I head to school a little earlier than usual so that I can gather my resources and sort them into the baskets.  Next I head to the copier and do all of my photocopying for the week. You will not believe what a difference this makes to my week! I can actually enjoy my lunch while it's still hot! And we all know that's a luxury that is hard to come by some days.

Sometimes a resource is used each day so at the end of the day, that gets moved into the next basket ready for the following day. This system means I don't have to waste precious teaching time searching for resources - it's all there at my fingertips. This also makes it a heap easier if I have to call in sick because it's all ready to go!

https://drive.google.com/file/d/0BwkilOIiFSfXVkJIcWZpbk9nQXM/view?usp=sharing


I've included a little freebie of my weekly labels so that you can make your very own time saving baskets as well. Just click here to grab a copy from my google drive.

I hope this little time saving tip helps bring some more time to your busy schedule! Please take some time to read through some of the other amazing time saving tips below and even add your own if you're a teacher blogger too!


Hello everyone!
 It's Casey here from Little Lifelong Learners! 

Today I would like to share with you how I implement Writer's Workshop into my Prep/Foundation classroom.


Writing is such an important skill for our students to master and it is really important to give your students time to work on this skill every day. It is for this reason that I implement a Writer's Workshop lesson every morning in my classroom.

At this early stage of the year, most Prep and Foundation students are at the stage where they can write using squiggly lines with some students who write letters or names they are familiar with.

 
To start my very first Writer's Workshop session, I ask my students to show me some writing in the sky with their fingers. We do some squiggly writing, zig zag writing and write some letters we have already learnt at school. I really reinforce that kids have their own way of writing (called Kid Writing) but with lots of practise, they can start to write like grown ups too. You might even get some students to come to the board and write an example of how they 'kid write' which might include the squiggles, their name or even a sight word or two. This gets them really excited and makes everyone feel like a writer already. It also shows your little writers that we can all write, we just do it differently at the beginning of the year.

Next I model what independent writing time will look like. I close my eyes and imagine what I'm going to write about while verbalising this process "Hmmm on the weekend I did some really fun things with my husband at the beach. I wish I could go to the beach right now! I think I might write about that today."

On my whiteboard, I start by drawing a picture to match what I thought about in my head. Then it's time to write! I get the students to help me with sounding out the words as I go. When we get to a tricky sound or word, we use a magic line to show that we know something needs to go there but we aren't too sure how to write it. I mostly focus on just beginning sounds or sounds that are very obvious so that I don't overwhelm the students. When students give me incorrect responses [y for was] I use their suggestions and praise them for trying really hard to hear the sounds and words we wanted, I don't correct them at this stage.

At the end, we celebrate as we read back our writing and see that it matches my picture beautifully. To conclude the session, I do my grown up writing underneath - we can then notice that there are lots of sounds that we got right! You could also get students to come up and write with you.


Next I ask my students to think about what they are going to write about. I encourage them to share their ideas with a friend before they head off to the tables to start their drawings and kid writing. At this stage of the year, we draw first and write second. After 15 minutes of drawing, I ask my students to start their writing to make sure everyone has time to get some kid writing done. I walk around with my aide during this time to help any students that aren't too sure and to do grown up writing on a few books as students finish.

Below are some photos of the writing that my Prep/Foundation students did after our very first modelled writing session in March (Term 1). They absolutely blew me away with how many sounds the students were using, as well as the magic lines! As you can see, some students were happy to write a few random letters while others tried really hard to sound out a few key words and some even attempted some sight words which we definitely hadn't started at school. The magic line (which is something I saw in the Kid Writing book by Eileen Feldgus & Isabell Cardonick) is such a great idea because it helps to teach new writers that there should be print for each word they say as they write.


After the students finish their writing, we go back to the carpet and I select 2 or 3 students to share their work. Some days I pick students who have worked really hard and other days I select students whose writing I can use for a mini lesson at the end of the session. For example, the student in the last piece of writing used a full stop so we could use this piece to discuss punctuation. I am very careful not to negatively comment on writing ever because new writers are often not very confident, so I would never use a piece of writing without a full stop at the end to talk about why we need punctuation. 

I found that having a free choice writing session every single day really helped my students in all areas of literacy! We often dictate to students what they should write about, so having this time each day for students to just write about anything they like is incredibly beneficial! By the end of the year, some students are using their Writer's Workshop time to write their own multi-page books. It's absolutely amazing to watch.

Each day, our writing routine was exactly the same, so I made up a little Writing Workshop Expectations chart which we refer to each morning before we start our session.


I hope you have found some useful tips in my post this week! Feel free to drop by the Little Lifelong Learners blog for more teaching ideas and resources.

Hi everyone, it's Casey from Little Lifelong Learners and today I would like to share some goal setting inspiration with you all!

http://littlelifelonglearners.com/

Setting goals in the primary years classroom enables both students and teachers to have a mutual understanding of expectations and a clear direction for classroom learning. With continued modelling, guidance and feedback, students are able to monitor their own progress throughout a learning activity and take ownership of their own learning. 

In my own classroom, I have implemented a writing goal chart. Each student has their own post-it note which can be moved once a student has reached their goal and sets a new one. They also have a little goal booklet in their book box where I write their writing goal. Each writing lesson, the students place their booklet on their desk to remind them of their goal.


You might be interested in these wonderful Reading and Writing Goal Reminder Slips from Miss Jacob's Little Learners too! 


 I also have some Key Learning Area Goal Setting Posters up in the classroom. I sometimes use these to write our goals on for the entire week and sometimes I use them at the beginning of a lesson to make our learning intentions clear. These are available in my TPT store.


 https://www.teacherspayteachers.com/Product/Content-Area-Goal-Setting-Posters-Set-of-9-1990974

Early Years with Sheri has goal charts displayed in her classroom as well. The yellow cards are for Writing Goals and green are for Maths Goals. The Expression, Fluency, Comprehension, Focus, Decoding and Vocabulary cards are for Reading and remind students of their personal goals.


I hope you've gotten some useful ideas for setting goals in your classroom! I would love to read some of your ideas in the comments.
Back to Top